
Step-by-Step Guide to Setting Up Xero for Your UAE Business

Running a business in the UAE means keeping your books clean, your VAT filings on time, and your reports accurate. That can sound like a lot, but cloud accounting tools like Xero accounting software make it simple.
If you’ve just started using Xero, this guide walks you through how to set it up for your UAE business. No accounting jargon, just clear steps and tips to help you get your books ready for smooth, compliant operations. Whether you manage your own books or work with a Xero accountant, this guide keeps everything simple.
Why Xero Is a Great Fit for UAE Businesses
Xero has become a favourite among small and medium businesses in the UAE. It’s cloud-based, meaning you can check your numbers anytime, anywhere. That’s a big win if your team, outsourced accountant or accounting outsourcing provider works remotely. When combined with Xero accounting services, the entire workflow becomes even more efficient.
Here’s what business owners in the UAE love about it:
- Automatic bank feeds – Your transactions flow in directly from your bank, so you don’t waste time entering them manually.
- Easy VAT setup – You can set up your UAE VAT codes once and let Xero handle the rest.
- Real-time reports – You’ll always know how your business is performing, without waiting for month-end reports.
- Simple invoicing – Send custom-branded invoices that match your business style.
- Secure cloud storage – No more lost files or backups. Everything stays safe online.
If your goal is to stay compliant, save time, and get a better view of your business, Xero accounting software is a great choice. Many SMEs also combine it with accounting outsourcing to streamline compliance.

Getting Started with Xero
Setting up Xero might sound technical, but it’s actually easy if you follow the right steps. Here’s how you can get your account up and running.
Step 1: Create Your Xero Account
Head to the Xero website and sign up for an account. You’ll enter basic information like your name, email, and business name.
Once you’ve verified your email, you’ll be directed to your Xero dashboard. This is where all your accounting tasks will happen invoicing, bank reconciliation, VAT reporting, and more.
If your business is registered in the UAE, make sure your organisation details (like your company name and country) reflect that correctly. It affects your default currency and tax settings later.
Step 2: Add Your Business Details
Go to Settings → Organisation details and enter your:
- Legal business name
- Address
- TRN (Tax Registration Number)
- Financial year-end (for example, 31 December)
- Logo (optional but looks great on invoices)
Adding accurate information here helps Xero generate reports and invoices that meet UAE VAT rules. A Xero accountant can also verify if your information meets compliance standards.
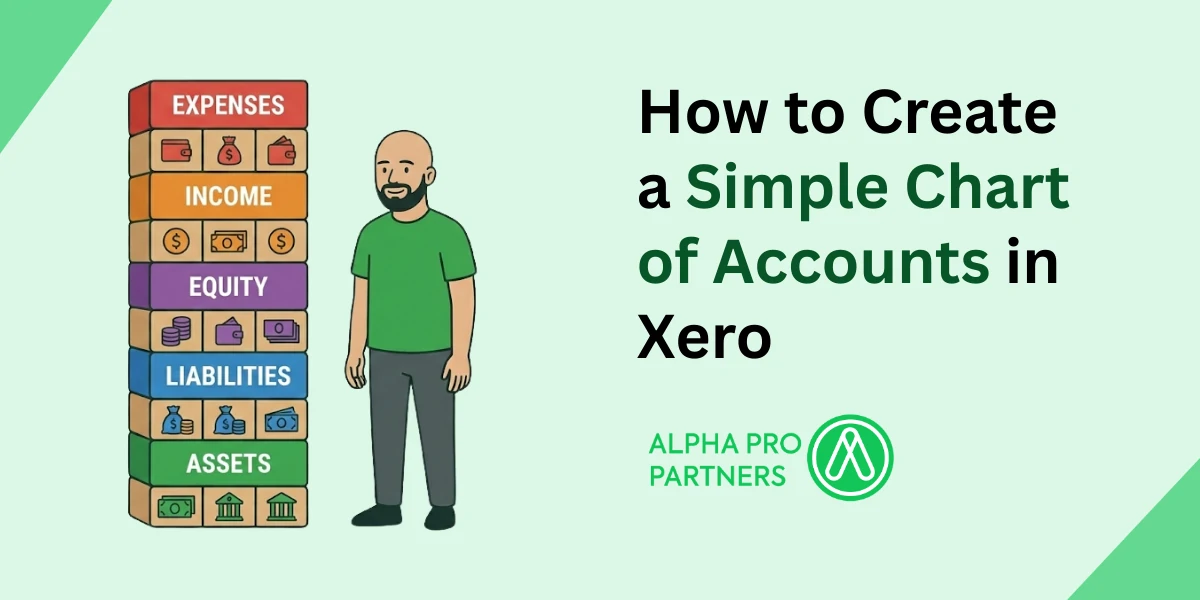
Step 3: Set Up Your Chart of Accounts
Think of your Chart of Accounts as the list of categories that track where your money goes like sales, rent, utilities, or marketing.
Xero already provides a basic chart when you start, but you can edit or add accounts based on your business needs. For example:
- If you’re an e-commerce store, you might add “Online Sales” and “Shipping Fees”.
- If you’re a service company, you could add “Consulting Income” or “Project Expenses”.
You don’t need to be an accountant to do this. Just make sure each account helps you see where your income and spending come from.
Step 4: Add Your Bank Account
This part is where Xero starts to shine. Connect your UAE bank account so your transactions automatically appear in Xero.
Many banks in the UAE allow direct connections. If yours doesn’t, you can still upload statements manually.
Once connected, you can match incoming and outgoing transactions with your invoices and bills. That’s called “bank reconciliation”, and it’s one of the biggest time-savers in Xero.
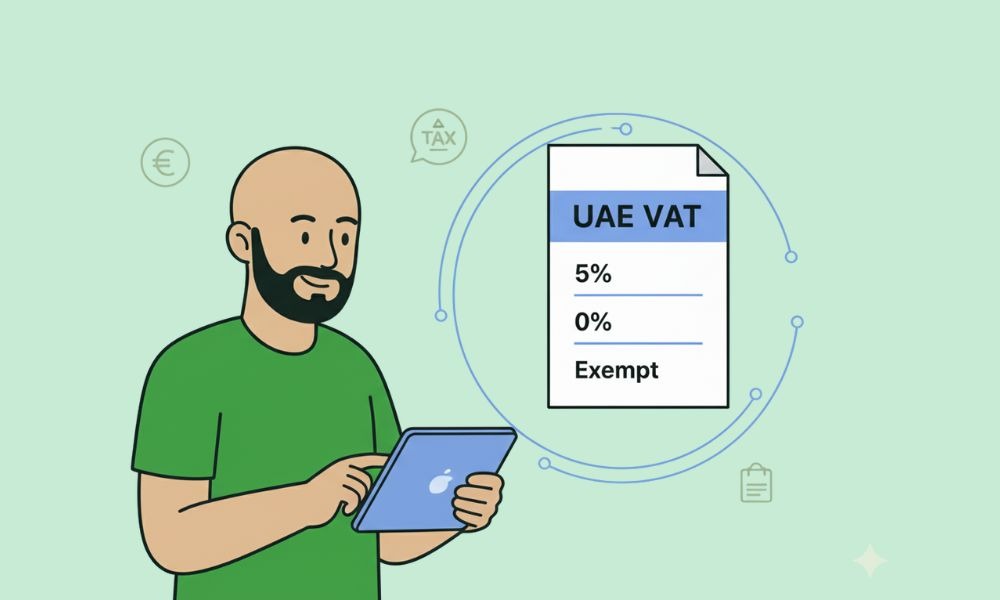
Step 5: Set Up Your VAT
If your business is VAT-registered in the UAE, you’ll want this part done right.
In Xero, go to Accounting → Advanced → Tax Rates and choose “UAE VAT”. Add your TRN, and Xero will automatically include the correct VAT rate in your invoices and bills.
You can set:
- 5% Standard Rate – For most goods and services
- 0% Rate – For exports or qualifying supplies
- Exempt – For transactions like residential rent or local passenger transport
Once done, Xero will calculate your VAT automatically every time you record a sale or purchase. You’ll be able to generate your VAT return directly inside Xero when it’s time to file. Many companies rely on a Xero accountant to ensure VAT is set up correctly.
Step 6: Create Your First Invoice
This is where it gets fun. Go to Business → Invoices → New Invoice.
Add your customer’s name, the service or product you’re charging for, and the amount. You can include VAT if applicable, and Xero will calculate it for you.
Customise your invoice with your logo, contact details, and payment terms. Then, email it directly to your client from Xero.
Once they pay, you can mark it as paid or let Xero automatically reconcile it with your bank feed.
Step 7: Add Bills and Expenses
Keeping track of bills is easy in Xero. You can upload supplier invoices or receipts, enter details like vendor name, date, and amount, and tag the right expense category.
If you use Xero’s mobile app, you can even snap photos of receipts and upload them on the go. No more missing receipts at tax time.
When your bills show up in your bank feed, you can match them with the transactions automatically.
Step 8: Invite Your Team or Accountant
If other people help you with your finances, like your Xero accountant or bookkeeper, you can give them access.
Go to Settings → Users → Invite a user and choose what they can see. For example, your accountant can have full access, while your sales manager might only see invoices.
This keeps everything transparent while still protecting sensitive data.

Step 9: Check Your Reports
Once your transactions are in Xero, you can start viewing reports.
Popular reports for UAE businesses include:
- Profit and Loss – Shows if your business is earning more than it spends.
- Balance Sheet – A snapshot of your assets and liabilities.
- VAT Report – Prepares data for your FTA submission.
These reports update automatically, so you always have an up-to-date picture of your business.
Step 10: Automate What You Can
Xero lets you automate repeating invoices, scheduled payments, and reminders.
For example, if you charge clients monthly, set up recurring invoices once, and Xero will send them automatically.
You can even set reminders to follow up on overdue payments, helping you maintain better cash flow.
Step 11: Connect Apps for Extra Features
Xero integrates with hundreds of apps from inventory management to payroll to payment gateways like Stripe.
If you’re an online store, connect Shopify or your payment system. If you’re in services, tools like HubSpot or Dext can save you time on admin work.
Just make sure any app you connect supports UAE VAT correctly.
Step 12: Back Up and Review
Since Xero stores data securely in the cloud, you don’t need to worry about backups. But it’s still smart to review your data regularly.
Check your invoices, bank reconciliations, and reports each month to keep things tidy.
Once you’ve completed these steps, you’re ready to use Xero confidently for your UAE business.
Need help setting up your Xero account the right way? Reach out to Alpha Pro Partners. Our team can help you get started smoothly and stay compliant with UAE VAT and corporate tax rules.
Tips to Keep Your Xero Account Running Smoothly
Here’s how to keep everything working perfectly after setup:
- Log in weekly to reconcile transactions.
- Review unpaid invoices and follow up early.
- Double-check VAT codes before submitting returns.
- Update your Chart of Accounts if your business changes.
- Schedule a monthly check-in with your accountant.
Doing these small things regularly keeps your financial records clean and your compliance simple.
Final Thoughts
Setting up Xero doesn’t have to be complicated. With the right steps, you can go from zero to fully functional in just a few hours.
Once your business is running in Xero, you’ll have a clear picture of your income, spending, and taxes. And the best part? You can access everything from your laptop or phone, wherever you are in the UAE.
If you want to make sure your Xero setup, VAT codes, and reporting are accurate from day one, contact Alpha Pro Partners today.
FAQs
What is Xero used for?
Xero is a cloud-based accounting software that helps businesses record income, track expenses, send invoices, and prepare VAT reports.
Can I use Xero for VAT filing in the UAE?
Yes. Xero can generate VAT reports that match the UAE Federal Tax Authority’s requirements. You just need to set up your VAT codes correctly.
Is Xero suitable for small businesses in Dubai?
Definitely. Xero is ideal for small and medium businesses that want simple bookkeeping and VAT compliance without complex systems.
Can I connect my UAE bank account to Xero?
Yes. Most UAE banks can connect directly, or you can upload statements manually if needed.
How do I record VAT on sales in Xero?
When creating an invoice, select the correct VAT rate. Xero automatically calculates the VAT amount and adds it to your reports.
What happens if I make a mistake in Xero?
You can edit most transactions or reverse them. Just make sure any VAT returns already filed are adjusted correctly.
Can I invite my accountant to Xero?
Yes. You can invite your accountant or bookkeeper to collaborate directly in your account.
Do I need an accountant if I use Xero?
While Xero simplifies accounting, having an accountant ensures your books and tax filings stay accurate and compliant.
Is Xero approved by the UAE FTA?
Xero is widely used across the UAE for VAT-registered businesses and supports FTA-compliant VAT reporting.
How much does Xero cost in the UAE?
Xero offers different subscription plans depending on your needs. Prices vary based on features and the number of users.
.webp)
.webp)
.webp)
.webp)
.webp)
.webp)

.webp)


.webp)
.webp)
.png)
.png)
.png)
.png)
.png)

.png)
.png)


.png)
.png)


.jpg)


.jpg)


.png)
.png)


.png)
